Easy Classic Cheese Ball: Your Go-To Holiday Appetizer
When it comes to effortlessly impressive appetizers, few dishes rival the timeless charm and undeniable deliciousness of a classic cheese ball. It's the kind of dish that disappears quickly from the buffet table, sparking conversations and satisfying cravings with every creamy, savory bite. Whether you're planning an intimate dinner party or hosting a grand holiday feast, mastering the art of the classic cheese ball ensures you always have a reliable, crowd-pleasing option up your sleeve. We're here to show you why this isn't just *a* cheese ball, but truly
the best cheese ball you can make – simple, versatile, and utterly irresistible.
Why the Classic Cheese Ball is the Best Cheese Ball for Any Gathering
What elevates a simple blend of cheese and seasonings to "the best cheese ball"? It boils down to a magical combination of simplicity, make-ahead convenience, and universal appeal. Unlike fussy appetizers that require last-minute assembly or delicate plating, a classic cheese ball is your culinary ally, ready to shine without breaking a sweat.
First and foremost, its **simplicity** is unmatched. With a handful of pantry staples like cream cheese, shredded cheddar, and a few choice seasonings, you can whip up a gourmet-tfeeling appetizer without any special grocery runs. Most home cooks already have these foundational ingredients on hand, making it a spontaneous option for unexpected guests or a last-minute party invite. The ease of combining these ingredients, shaping them, and letting them chill makes it accessible even for novice cooks.
Beyond its straightforward preparation, the cheese ball boasts incredible **versatility**. It's a culinary chameleon, adapting effortlessly to various palates and preferences. Serve it with an array of dippers – crisp crackers, crunchy celery sticks, sweet bell pepper slices, or even tart apple wedges – and watch as something as plain as a carrot stick transforms into a delightful vehicle for creamy, rich flavor. This inherent adaptability makes it a surefire hit at any event, appealing to everyone from the pickiest eaters to the most discerning foodies.
Perhaps its greatest superpower, especially for busy hosts, is its **make-ahead potential**. Imagine a holiday morning or the frantic hours before a party: the last thing you want is another complicated dish demanding your immediate attention. The beauty of a classic cheese ball is that it tastes even better when assembled the day before, allowing the flavors to meld and deepen in the fridge. This means you can tick a major item off your party prep list well in advance, freeing you up to focus on other dishes or, more importantly, enjoy your guests. For detailed guidance on preparing this ahead of time, check out our insights on
Make-Ahead Cheese Ball: Perfect Party Appetizer Recipe. This strategic advantage truly solidifies its reputation as
the best cheese ball for stress-free entertaining.
Crafting Your Classic Cheese Ball: Ingredients & Assembly
Creating
the best cheese ball starts with understanding the role of each ingredient and following a few simple steps. The magic lies in the balance of creamy texture, sharp flavor, and satisfying crunch.
**Core Ingredients:**
*
Cream Cheese (softened): This is the backbone of your cheese ball, providing its signature creamy texture. *The key here is softened cream cheese.* If it’s cold, it will be lumpy and difficult to mix smoothly. Take it out of the fridge at least an hour before you plan to mix, or gently warm it in the microwave for 15-30 seconds until pliable.
*
Shredded Cheddar Cheese: For a truly classic flavor, sharp or extra-sharp cheddar is the go-to. Its robust, tangy profile complements the milder cream cheese beautifully. While you *can* buy pre-shredded cheese, shredding your own from a block often yields better flavor and a creamier melt, as pre-shredded varieties sometimes contain anti-caking agents.
*
Flavor Boosters: A touch of Worcestershire sauce adds umami depth and a subtle tang, while garlic salt (or minced fresh garlic and a pinch of salt) provides that essential savory aroma. Freshly ground black pepper also elevates the overall flavor profile.
*
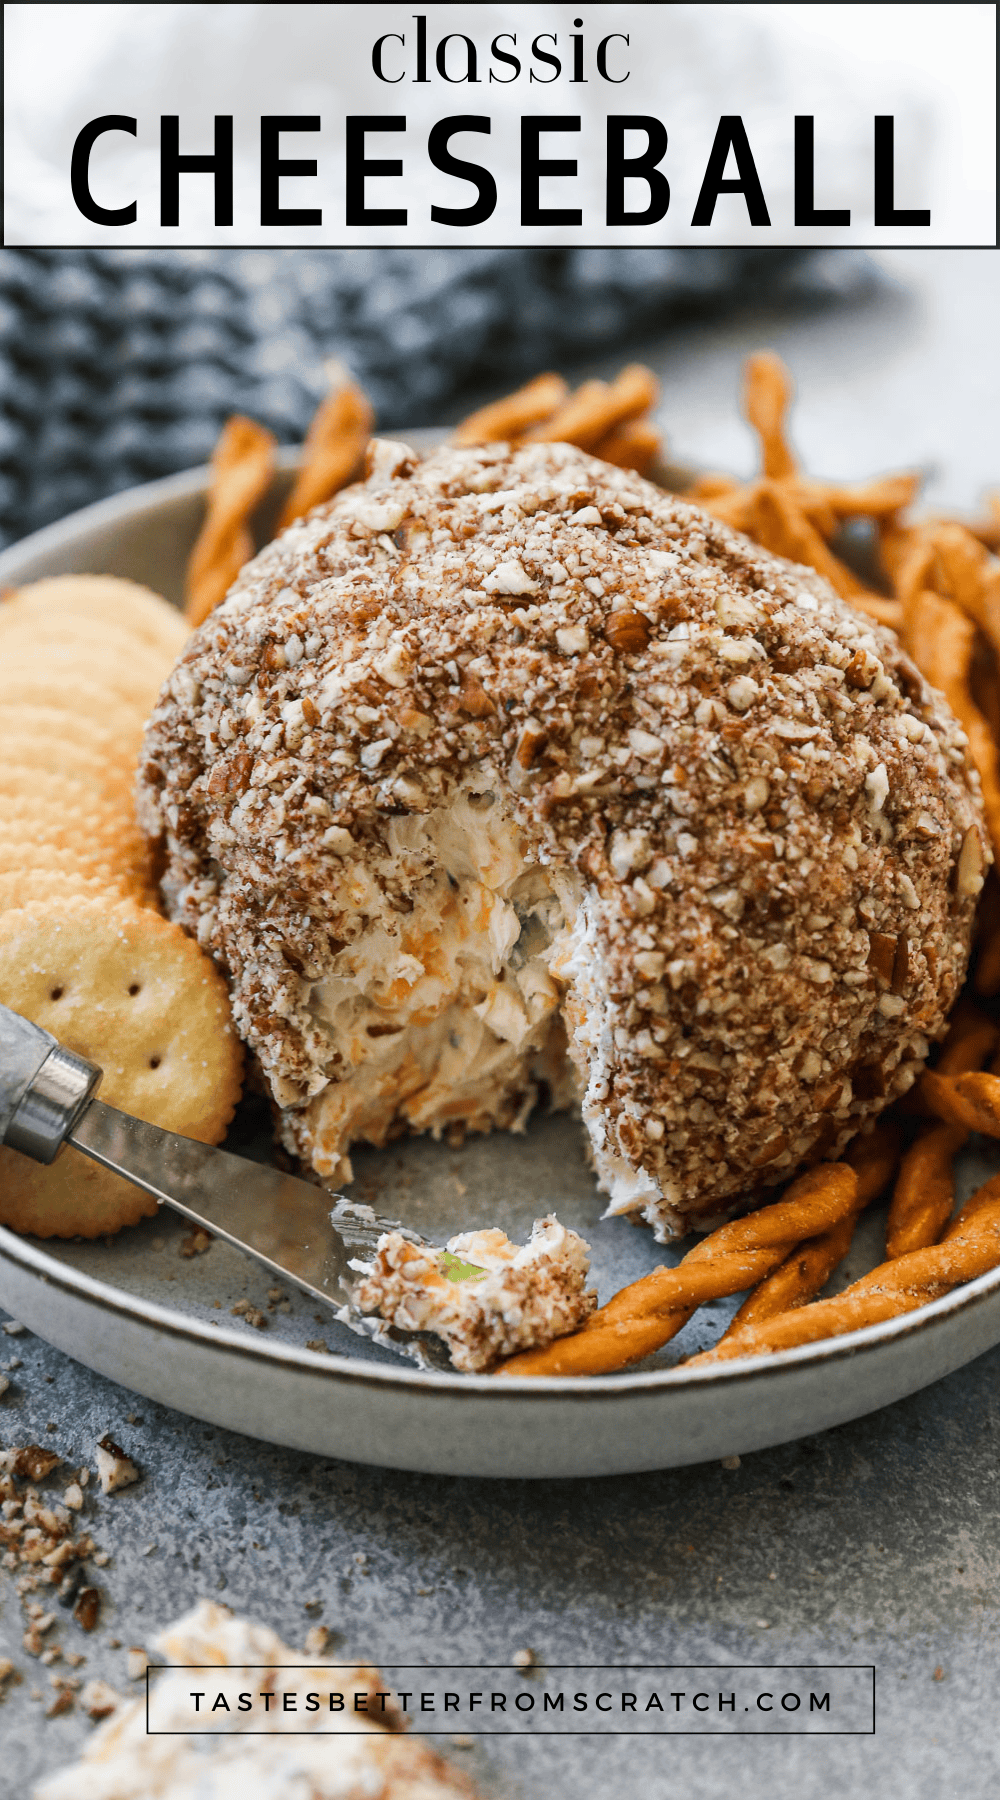
Chopped Pecans: These are traditionally used for the outer coating, providing a delightful textural contrast and nutty flavor. Toasting them lightly beforehand can enhance their aroma even further.
**Simple Assembly Steps:**
1. **Combine the Cheeses and Seasonings:** In a medium-sized bowl, combine the softened cream cheese, shredded cheddar, Worcestershire sauce, and garlic salt (and any other desired internal mix-ins). Use a sturdy spoon, a rubber spatula, or for even easier mixing, a hand mixer or stand mixer with the paddle attachment, to blend until all ingredients are thoroughly combined and smooth. Ensure there are no streaks of unmixed cream cheese.
2. **Form the Ball:** Once your mixture is homogenous, scrape it out onto a piece of plastic wrap. Using the plastic wrap to help, gently form the mixture into a neat ball. The plastic wrap will keep your hands clean and help achieve a perfectly rounded shape.
3. **Chill to Firm:** Wrap the formed cheese ball tightly in plastic wrap and refrigerate for at least 1-2 hours. This chilling step is crucial, as it allows the cheese ball to firm up, making it easier to handle and roll, and giving the flavors time to meld. For make-ahead purposes, you can chill it overnight or even for a couple of days.
4. **Roll in Coating:** Just before serving, unwrap the firm cheese ball. Spread the chopped pecans (or your chosen coating) on a shallow plate or cutting board. Gently roll the cheese ball in the pecans, pressing them gently to adhere them completely to the surface. Ensure an even coating all around.
5. **Serve:** Transfer your beautifully coated cheese ball to a serving platter and arrange your favorite dippers around it.
Elevating Your Cheese Ball Experience: Serving Suggestions & Customizations
While the classic cheese ball is perfect in its pure form, its inherent versatility invites endless opportunities for personalization. This is where you can truly make it your own and ensure it’s unequivocally
the best cheese ball for *your* taste and occasion.
**Diverse Serving Suggestions:**
The right accompaniments can transform your cheese ball into a truly gourmet experience. Think beyond standard crackers and get creative:
*
Crackers Galore: Offer a variety! From buttery Ritz-style crackers to rustic water crackers, sourdough discard crackers, or even homemade pita chips, each provides a different texture and flavor profile.
*
Fresh & Crunchy Vegetables: Crisp celery sticks, vibrant carrot sticks, cool cucumber slices, and colorful bell pepper strips are fantastic. The freshness and crunch provide a wonderful contrast to the creamy cheese. Consider blanched asparagus spears or endive leaves for an elegant touch.
*
Artisan Breads: Thinly sliced baguette (toasted or fresh), mini pretzel bites, or even slices of your favorite sourdough bread can be excellent dippers.
*
Sweet Surprises: Don't shy away from unexpected pairings! Crisp apple slices (like Granny Smith or Honeycrisp) or pear slices offer a delightful sweet-tart counterpoint that balances the savory richness of the cheese.
**Endless Customization Ideas:**
This is where the fun truly begins! The reference context hints at many options, and we encourage you to explore them to tailor your cheese ball to any event or preference. For an exhaustive guide to personalizing your creation, check out
Customize Your Cheese Ball: Endless Flavor Combinations.
*
Cheese Swaps for Different Flavor Profiles:
* For a richer flavor, swap some cream cheese for mascarpone.
* For a tangier kick, replace a portion of the cream cheese with sour cream or Greek yogurt.
* Beyond cheddar, experiment with shredded Parmesan, zesty pepper jack, nutty Gruyère, or even a smoked gouda for a sophisticated twist.
*
Flavorful Mix-Ins (Internal):
* **Savory:** Finely minced green onions, chives, fresh or dried dill, sun-dried tomatoes (finely chopped), minced garlic or shallots, diced jalapeños (seeded for less heat), cooked and crumbled bacon, a splash of hot sauce, or a hint of Dijon mustard.
* **Sweet:** Dried cranberries, finely crushed and well-drained pineapple, other dried fruits like apricots, or a swirl of pepper jelly marbled through the center.
*
Creative Coatings (External):
* Beyond pecans, try finely chopped walnuts, almonds, pistachios, or a blend of seeds (sesame, poppy, sunflower).
* For an everything bagel-inspired taste, use everything bagel seasoning.
* Crumbled crispy bacon, fresh chopped parsley, or even a mix of finely shredded Parmesan and black pepper can make stunning and delicious coatings.
Consider the occasion: a "spicy fiesta" cheese ball with pepper jack, jalapeños, and a chili powder coating, or a "Mediterranean delight" with feta, sun-dried tomatoes, and a pistachio-parsley coating. The possibilities are truly limitless, ensuring you can craft
the best cheese ball for every scenario.
Make-Ahead & Freezing Tips: Your Secret to Stress-Free Entertaining
One of the most compelling reasons why the classic cheese ball reigns as
the best cheese ball for any host is its incredible make-ahead and freezing capabilities. This feature is a game-changer for reducing day-of stress and ensuring you can enjoy your own party.
**Making Ahead:**
As mentioned, a cheese ball actually benefits from being made in advance. The flavors have time to meld and deepen, resulting in a more harmonious and complex taste.
1. **Assemble and Shape:** Follow the steps for combining ingredients and forming the ball. Do *not* roll it in the external coating yet.
2. **Chill Thoroughly:** Wrap the naked cheese ball tightly in several layers of plastic wrap, ensuring no air can get to it. Place it in the refrigerator for at least 24 hours, or up to 3-4 days.
3. **Coat Before Serving:** About 15-30 minutes before you plan to serve, unwrap the cheese ball and roll it in your chosen coating. This ensures the coating remains fresh and crunchy. Then, arrange it on your platter with dippers.
**Freezing for Future Feasts:**
This is where the cheese ball truly shines as a hero for proactive hosts. You can easily double or even triple a batch and freeze some for future entertaining emergencies or spontaneous gatherings.
1. **Prepare and Wrap for Freezing:** After forming the cheese ball and before adding the outer coating, wrap it extremely well. Use at least two layers of plastic wrap, pressing out any air bubbles, followed by a layer of aluminum foil. This triple-layer protection prevents freezer burn and keeps unwanted odors from seeping in.
2. **Label and Freeze:** Label the package with the date and contents. Place the cheese ball in the freezer for up to one month. While some sources suggest longer, a month ensures optimal flavor and texture.
3. **Thawing for Serving:** When you're ready to use it, transfer the frozen cheese ball to the refrigerator the night before (12-24 hours) to thaw slowly and safely. Avoid thawing at room temperature, as this can affect the texture and safety.
4. **Coat and Serve:** Once fully thawed, unwrap the cheese ball, give it a gentle reshape if needed, and then roll it in your desired coating just before serving.
Having a frozen cheese ball ready to go is like having a secret weapon in your entertaining arsenal. It takes the pressure off last-minute prep and allows you to present a delicious, impressive appetizer with minimal effort, solidifying its status as
the best cheese ball for convenience.
Conclusion
The classic cheese ball stands as a testament to the power of simple ingredients combined with thoughtful preparation. Its unparalleled ease, versatility, and make-ahead capabilities truly make it
the best cheese ball for any occasion, from casual get-togethers to grand holiday celebrations. It’s a dish that feels special to serve but requires minimal fuss, allowing you to create delicious memories without the stress. So, whether you stick to the timeless cheddar and pecan combination or venture into exciting new flavor profiles, embrace the joy of crafting this beloved appetizer. Your guests—and your sanity—will thank you!